In this article, we'll look at the most common hand tools used in woodworking, from Planes and Chisels to Retractable steel tapes and Vises. We'll also cover specialized tools like the jigsaw or circular saw. We'll also cover the Jack Hand airplane. The Jack Hand is a medium-sized plane that sits on the bench and can temporarily replace certain planes for specific tasks. It can be used for roughing, joining board edges and smoothing board edges.
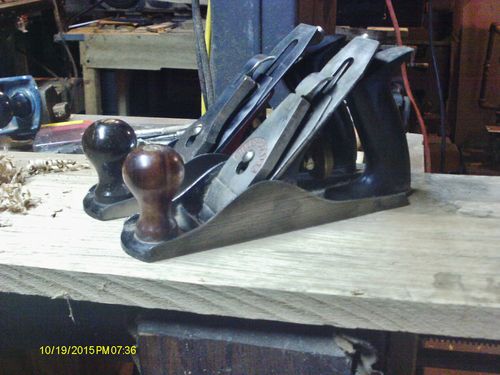
Planes
There are many kinds of planes for woodworking with hand tools. There are smoothing or carving planes, jointer or bench planes and jointer planes. Each type is designed for a specific task. For example, the smoothing plane is used in the final stage of woodworking projects prior to treating the wood. There are many sizes of planes that can be used for woodworking using hand tools. The right plane for you will depend on your project's size and purpose.
Chisels
A chisel refers to a large pointed tool that is used to carve or do other forms woodworking. These tools are used to shape pieces after they have been turned by a wooden turning machine. To create exquisite works of art, a skilled woodworker may use chisels. However, chisels are one of the most common hand tools that can become dull. To avoid any damage, it is important to properly store chisels.
Steel tapes that retract
These steel retractable tapes are great for having in your shop. However, they can also slow down the flow of your work. The measuring tape blade will be the most worn, so make sure you choose a tape with a strong retraction mechanism. The blade can become dulled or worn and may make it difficult to read markings. The accuracy of the measuring tape should also be considered when buying one. There are many types of measuring tapes, and some are more accurate that others. Choose one with the highest accuracy rating.
Vises
A vise is essential if you want to be serious about woodworking. The front vise has the most widespread use and can be bought for this purpose. These are easy-to-install and do not require any technical skills. These are also known as front vises. They can be used to attach end vises. Hardware includes the screw, guide bars and wood jaws. You will need to purchase the wood separately.
Clamps
There are many woodworking clamps available. The best way to make your projects easier is by choosing the right one. You can easily identify the type, size, and shape of these clamps. A manufacturer's manual will help you identify the correct one for your project. Before you purchase a clamp, here are some important points to remember. The right clamp can make work much easier and more precise.
Screwdrivers
Screwdrivers appeared for the first time around 1812. They have evolved tremendously over the years. Unlike their predecessors, they are no longer rounded or square. Instead, their heads are made with four extra points of contact, allowing significant torque during driving. Pozi screws are much more difficult than phillips screw. Modern screwdrivers usually have a magnetic tip for easier extraction. They are hexagonal in cross section and have a pear-shaped handle made of wood.

Grippers
Grippers can be used by woodworkers to hold onto the saw blades. Grippers grip the off-cut piece as well as the prescribed cut, preventing burns and kickbacks. To keep the gripper level, the L-bracket can be used. Measure the gripper's height using a micrometer. Mark it with chalk before using it. Cut it in the right way.
Knives
A knife is designed to remove the wood's outer fibres, giving you a cleaner cut. In woodworking, a pencil line is often used to mark the position of a cut, but a lead pencil is rarely sharpened to a pin point. This allows for some variation in marking lines which can impact the quality of your project and the strength of the joints.
Drills
For woodworking, it is essential to have both power and torque. A drill with high torque is not necessary. Be aware of the intended purpose. Make sure you choose the correct power and torque drill for your task. For more control, choose one with a variable speed range. Do-it-yourselfers will appreciate the flexibility of being able to adjust the speed to achieve a variety of results.
FAQ
How can I tell what kind of wood I am working with?
Always verify the label on wood purchases. The label should contain information about the wood species, its moisture content, and whether it has been treated with preservatives.
Is it hard to start my own woodworking business?
It's not easy to start your own woodworking business. You will need to adhere to many legal requirements. It doesn't mean that you have to go through the entire process of starting a business. Many people opt to join existing businesses instead. You only need to pay membership and tax fees.
How do you calculate woodworking prices?
It is crucial to keep project costs as low-cost as possible. Make sure you're getting the best prices on materials. Also, consider all other factors that can affect the price of your projects such as skill level, experience, time and cost. Our guide to the average household DIY task price will give you an idea of how much it costs to complete different types of woodwork projects.
How much money does a hobbyist have to put into getting started?
To start your own woodworking company, you will likely need capital to purchase the necessary tools and other supplies. A good place to start would be by buying a small table saw, drill press, circular saw, jigsaw, and sanding machine. These items don't cost much so they won't break your budget.
Is it necessary to be a genius in woodworking to succeed?
No. Woodworking is not difficult. It is possible to learn basic tools and techniques that will allow you to create beautiful art.
Statistics
- Most woodworkers agree that lumber moisture needs to be under 10% for building furniture. (woodandshop.com)
- If your lumber isn't as dry as you would like when you purchase it (over 22% in Glen Huey's opinion…probably over 10-15% in my opinion), then it's a good idea to let it acclimate to your workshop for a couple of weeks. (woodandshop.com)
- The U.S. Bureau of Labor Statistics (BLS) estimates that the number of jobs for woodworkers will decline by 4% between 2019 and 2029. (indeed.com)
- Overall employment of woodworkers is projected to grow 8 percent from 2020 to 2030, about as fast as the average for all occupations. (bls.gov)
External Links
How To
Here are some tips on how to drive nails in wood
When driving a nail into wood, it is important to first choose the correct size and kind of hammer. The most common types of hammers are claw hammers, sledgehammers, mallets, ball peen hammers, and hatchets. Each type of hammer has its pros and cons. For example, a claw hammer works best when you want to hit something hard, like nails; however, it's difficult to control precisely where the blow lands. Although a sledgehammer can be used to hit large areas quickly, it is too heavy to be useful for small tasks.
After you've chosen the right tool, hold your hand flat to the handle so it rests comfortably in one of your palms. Grab the handle tightly, but do not squeeze too hard. The hammer should be held straight up with your wrist relaxed. Swing the hammer back towards the ground, with your aim at the middle of the nail. You should feel the impact from the hammer striking a nail. If you're having trouble getting the hang of swinging a hammer, practice with a block of wood until you get the rhythm down.
The hammer should be held close to your body when you are ready to begin driving the nail. The nail should be perpendicular to wood's surface. Keep your eyes on the tip. Then, swing the hammer forward. Next, follow the motion of your hammerhead. Continue this motion several times, slowly increasing the speed of each swing. Once you have mastered this technique, increase the power of your swings. To make it more powerful, hold the hammer up high to your shoulder and then bring it down. This will help you put more energy behind each of your moves.
Once you've nailed the first hole, remove the hammer from the nail. To pull out the remaining nails, use a screwdriver or pry bar. To avoid splitting the wood, make sure the nail heads are not touching the board's surface.