It is important to understand which woods are the best for your walking stick before you start carving it. Learn more about whittling techniques and what David Allen uses when he carves his walking sticks. A few famous quotes about walking sticks are also available. These are some tips to help you create the perfect walking stick. Read on to learn more. You can now carve a walkingstick that will be functional and unique!
Woods that can be used for carving a walkingstick
The hardest part of carving is finding the right blank. Although you might find a few trees with bent branches, it is important to keep looking until you find a straight section. A straight branch can be harvested during winter when the sap is moving from the roots to the branches. This will make the wood more stable, and less likely to split. You can harvest the wood as soon as the tree is green, even if it is too late for the spring.
A walking stick can be carved from many species of wood. North American chestnut wood is strong and durable. Its density makes it ideal to make walking sticks, and other similar tools. This wood grain is sometimes slightly open or slightly closed. This makes it a sturdy walking stick that feels stable and smooth. It is also quite attractive and is widely used in carving. Some species can even be carved with the bark in place.
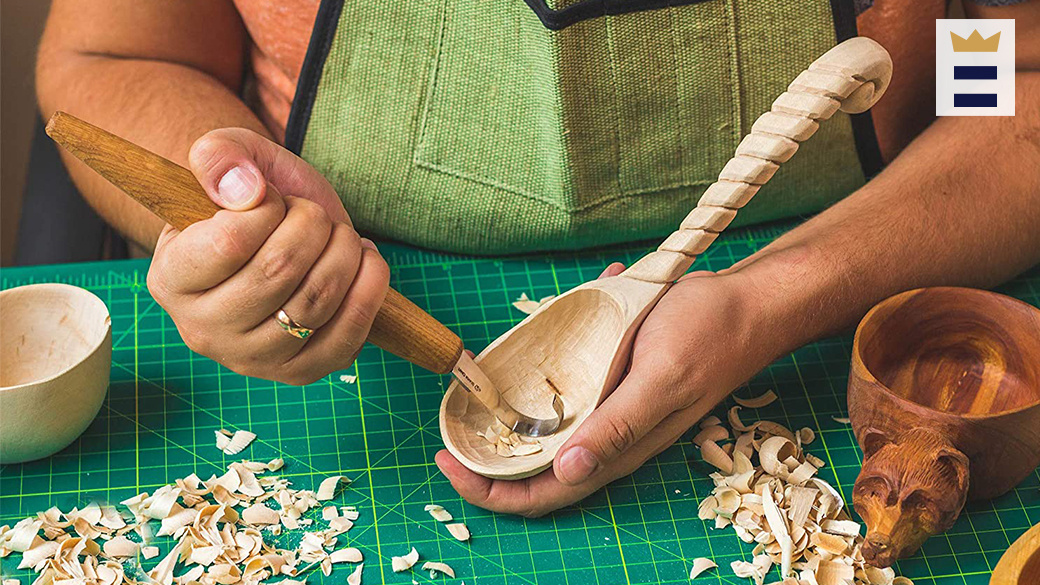
Techniques to whittle a walking sticks
There are several basic ways to carve walking sticks. First, pick a piece that has a unique texture. Some woods have distinctive bark marks and colors, and other woods have natural swirls. These features can be enhanced with lacquer and paint. You may also want to carve the shaft of wood to enhance its beauty. Finally, ensure you choose straight sticks that are free of branch shoots and tough spikes.
In this book, you'll learn about the different types of wood and different carving styles. The most popular designs are snakes or lions. There are many realistic designs you can create, including snakes and fish. These artists are often regarded as God-given. This book is both for the experienced and the novice carver.
David Allen uses the following tools for carving a walkingstick
When David Allen was a young boy, he began making toys with a pocketknife he found under his house. It was too dangerous for him to use as a knife and he had it hidden from his family. His creations include toys such as slingshots and utilitarian items like shoeshine box. At the age of 15, Allen became disabled and began carving walking sticks. Allen used a pocketknife and chisel to carve out the wood.
Allen created his designs by himself, digging around sapling roots and then deciding what to carve. Allen believed that a design must "see" itself before it can be carved. This was the same process as many other African-American artists. Allen often had visions or dreams about the design that he wanted. Allen was able to create a stick with the right emotions and sentiments for his community.
Famous quotes about walking sticks
Carving a walk stick is a difficult process. You need a good blank. This is the most challenging part of the whole project. You have many options, but it takes persistence to find one that is straight. The stick may seem bent beyond practical use but you will keep looking until one is found. It is best to cut your stick during winter sap flow from the tree's branches down to the root. The sap makes the wood softer and less likely split.
The wood's texture, color and grain are important considerations when selecting wood. Each piece of wood has its own unique texture and color, and may have unique swirls or bark marks. These natural swirls will be enhanced by a coat of lacquer. A smooth finish is possible by choosing a wood shaft that is free from branch shoots and tough spikes. This will make it easier. You should consider what type of finishing you will use, regardless of the material.
FAQ
Where can I purchase woodworking supplies
You can find everything you need in many places. For example, you could visit local hardware stores or look online at websites like Amazon.com.
For furniture and other materials that you can reuse, check out flea markets and garage sales.
How often should I get new supplies?
You'll probably have to replace some of your tools over time. You'll need to sharpen your hand tools regularly if you use them. For power tools, replacement parts will be required frequently. To avoid buying too much at once, try to spread your purchases out over a few months.
What woods are suitable for making furniture?
Woods are classified according their hardness. Softwoods include cedar, pine, cedar, and Cypress. They are great for outdoor furniture as they resist rot. The hardwoods are oak, maple and mahogany. They are generally indoors as they don't weather well outside.
How can my shop be organized?
The first step toward keeping your workshop clean and organized is to set aside a designated area for storing tools. To keep your tools sharp and ready for work, keep them clean of dust and debris. To hang accessories and tools, use pegboard hooks.
Statistics
- Most woodworkers agree that lumber moisture needs to be under 10% for building furniture. (woodandshop.com)
- The best-paid 10 percent make $76,000, while the lowest-paid 10 percent make $34,000. (zippia.com)
- Woodworkers on the lower end of that spectrum, the bottom 10% to be exact, make roughly $24,000 a year, while the top 10% makes $108,000. (zippia.com)
- Overall employment of woodworkers is projected to grow 8 percent from 2020 to 2030, about as fast as the average for all occupations. (bls.gov)
External Links
How To
How to make wood joints
This tutorial will demonstrate how to join two pieces together of wood. We'll use the "pocket hole joint," which means we drill holes in the wood and then glue them together. If your wood is straight and flat, this method will work well. You might consider dowel joinery if your wood isn’t straight or flat. Here are the steps
-
Drill Pocket Hole Joints. Measure and mark the location where you would like to place the pocket hole joint. Next, drill 3/4 inch holes in each end of each piece using a handheld drilling machine or jigsaw.
-
Sand Smooth. The wood's edges can be sanded to prevent splitting.
-
Glue the two sides of the wood together. Apply glue on both sides of the wooden plank. Let it sit for about 5 minutes before clamping the pieces together.
-
Fix the Pieces together. Once the glue has dried, clamp the pieces together so they are flush.
-
Trim Joinery. Trim the excess wood around the joint after the glue has dried completely.
To be able to turn the pieces inside-out, leave enough room between them.