
You've likely tried chip carving before and it's not an easy task. There are many different styles and techniques that you can try, but which one is best? What tools are you going to need? This article will give you my top tips and tricks when carving chips. You'll discover that chip carving success is possible with several key elements.
Traditional
Chip carving is one of oldest forms of woodcarving. A straight-edged knife is required, however, a skew ground or offset blade knife may also be used. Chip carving is a technique that involves making small, triangular incisions into wood in order to create a pattern. This art form was developed simultaneously in several countries and dates back over 1000 years. Due to its popularity, many of the designs were so similar across cultures that it was hard to distinguish one from the other.
As woodcarving became more widespread, the skills necessary to do the job were handed down from one generation to the next. Chip carving is a popular method of decorating furniture in Sweden. In fact, there were even schools that taught the art. Modern chip carvers are able to benefit from the centuries-old skills and knowledge of carvers. Through the generations, knowledge and experience was passed down from carver to apprentice and student. It's a lifelong process that continues today.
Free Form
This DVD will teach you how to chip carve. A DVD by Murray Taylor shows you how to create freeform and geometric carvings. This DVD is a great introductory project that provides lots of information. English and NTSC formats can be found. You can also purchase the DVD in stereo and widescreen. Artisan Media Ltd. owns the DVD and it's available in MP4 for Windows and Mac computers.
Triangles, lines, and circles are the most common shapes used in geometric chip carving. This technique can be combined with different styles and shapes to create endless possibilities. This technique is also known by the free-form style of chip carving. Regardless of whether you want your chips to be a flower or a dragon, it will be a wonderful addition to any room. You can incorporate multiple techniques into one piece by free-form chip carving.
Techniques
Chip carving has been around since the beginning of time. You can find examples in many countries around the globe. On paddles used for ceremonial purposes and boats in the South Pacific Islands, one example of chip-carving is found. Most likely, these carvings were made with pieces of bone and shells. However, some people report using shark teeth. This book demonstrates how to use a variety of chip carving techniques to produce stunning designs.
You can easily carve chip if your follow some basic steps. The first is to understand how to carve the fine Triangle. This pattern is simple to follow and understand. To carve this pattern you will simply need to make several triangles. Then, repeat this process. However, this does not mean that your chip carving has to be boring - by varying the triangles, you can create a range of wonderful patterns.
Tools
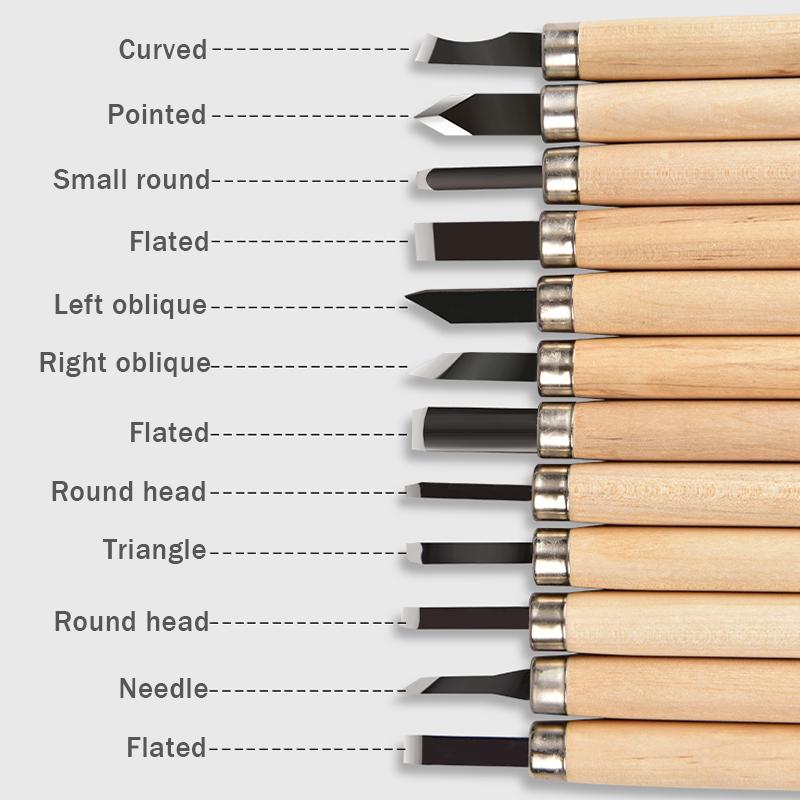
Lora S. Irish will provide a free online seminar on chip carving. She will show you how to use various carving tools, including a stab knife, chip knife, and detail bench knife. Irish will also discuss the different types wood carving tools in this seminar. You can choose from the list below to purchase the right tool for your carving needs. These tools are versatile enough to create simple shapes or intricate designs.
A chip carving knife employs special geometry. It measures approximately one-half inches in length and has a narrow, curved edge at the back. This allows for precise incisions. To ensure perfect edges, it is crucial to choose a sharp, pointed point. Also made of stainless steel, chip carving knives come with a sharp point. A chip carving knife should be sharp enough to cut a sliver of wood.
Getting started
You must learn the basics of chip carving before you start. This process varies based on the type of carving that you intend to do. To ensure accuracy, it is important to be familiar with the following principles. Chip carving is a technique that involves creating a fine pattern in wood. Follow these steps to create your very first chip carve.
It is important to properly sharpen a chip carving knife. You will notice that the blade of the chip carve knife has bevels on both sides. This is an indication that it's a primary chip carve knife. The sharpening stone can produce precise edges and is designed to look like a diamond. Place the stone at a 10 degree angle. The stone will sharpen the chip carving knife and chip carving tool at the same time.
FAQ
How do you calculate woodworking costs?
The most important thing to remember when calculating costs for any project is to keep them as low as possible. You should always try to make sure that you are getting the best deal on materials. It is important to take into consideration all factors that can impact the cost of your projects. These include time, skill and experience. Check out our guide on the average cost of common DIY projects to get an idea of how much you can spend on woodwork projects.
Is it necessary to be a genius in woodworking to succeed?
No. Woodworking is not rocket science. To create stunning works of art, anyone can learn to use basic power tools.
What is the average time it takes to finish furniture?
It depends on which wood you choose, how complicated your design is and what amount of finishing you apply. Hardwoods, for example, require more maintenance than softwoods. Hardwoods also tend to be more expensive than softwoods. But they last longer and resist moisture better. It takes between one and three months to finish a piece.
Which woods are good to use for furniture-making?
Woods can be classified according to how hard they are. Softwoods include cedar and pine as well as cedar and cedar. They're often used for outdoor furniture because they don't rot easily. These hardwoods include maple, mahogany and teak. They're generally used indoors because they won't weather well outdoors.
Statistics
- Overall employment of woodworkers is projected to grow 8 percent from 2020 to 2030, about as fast as the average for all occupations. (bls.gov)
- In 2014, there were just over 237,000 jobs for all woodworkers, with other wood product manufacturing employing 23 percent; wood kitchen cabinets and countertop manufacturing employing 21 percent. (theartcareerproject.com)
- Woodworkers on the lower end of that spectrum, the bottom 10% to be exact, make roughly $24,000 a year, while the top 10% makes $108,000. (zippia.com)
- If your lumber isn't as dry as you would like when you purchase it (over 22% in Glen Huey's opinion…probably over 10-15% in my opinion), then it's a good idea to let it acclimate to your workshop for a couple of weeks. (woodandshop.com)
External Links
How To
How to stain wood
Staining wood is the process of applying chemicals to the wood's exterior, which alters its color. This chemical reaction causes the wood to change from white to brownish red. Oak is the most commonly used wood for staining, but other woods can also be stained.
There are several ways to apply stains to wood surfaces. Mixing the stain in a solvent such as turpentine and spraying it onto the wood is one method. Others use a solution made up of water and dye, which is then applied directly onto the wood. You can mix stains into varnishes or paints to make them part of your finish coat.
Preparing the surface for staining wood is the first step. You must clean the wood well to remove any grease or dirt that might interfere with the application of the stain. Sanding smoothens any scratches or rough spots. The next step is to choose the stain type you want. There are two main types of stain: non-penetrating and penetrating. Penetrating colors penetrate deeper into wood than those that are non-penetrating. This makes them more suitable for darker colors, such as mahogany. Light colors such as maple work well with non-penetrating stain.
You will need to decide on the type of stain you want to use, and then prepare your tools. A paintbrush works well for applying stains because it allows you to spread the liquid evenly across the surface. It is a good idea to have rags on hand in case you need them to clean up any stains that may remain after you have finished painting. If you intend to mix the stain yourself you will need enough containers to hold all the components.
After you have prepared your materials, clean the area you intend to stain. To remove dirt and dust, use warm water and soap. Wipe down all furniture pieces with a dampened cloth and clean water. If you intend to stain darker wood, make sure you get rid of any debris.
The stain should be applied next. Begin at one end and spray or brush the stain on the wood. Move slowly and carefully along the grain of your wood until you reach its opposite end. Be careful not to let the stain drip off the wood's edge. Before you proceed with the next steps, let the stain dry completely.
Clear polyurethane is used to protect the painted surfaces. Three coats are recommended for polyurethane. Allow the third coat to dry overnight before sanding the final coat.